Auto Generate C++ APIs for Peripherals and More
Introducing a Go Utilty "bitfieldgen" for generating C++ code
If you have ever built an embedded project, tinkered with Arduino or similar dev boards, you've heard of I2C. A serial bus protocol, popular for communicating with peripherals that comprise sensors, codecs, LEDs, etc. Other protocols such as SPI, UART, and RS-485 also exist in this space.
When writing Embedded Software, you often write "device drivers". In Linux, they are pretty standardized. For Real Time OSes or Bare Metal programming, there is less standardization. For micro-controller projects that run RTOS or Bare Meta, implementation of the Hardware Abstraction Layer varies across organizations. In the following discussion, we will go over some good practices to generate accessor methods aka APIs for register programming. We will focus on a data structure of C and later C++, known as the "struct bitfields". It encapsulates the register fields in a memory-efficient manner and improves readability for accessing them.
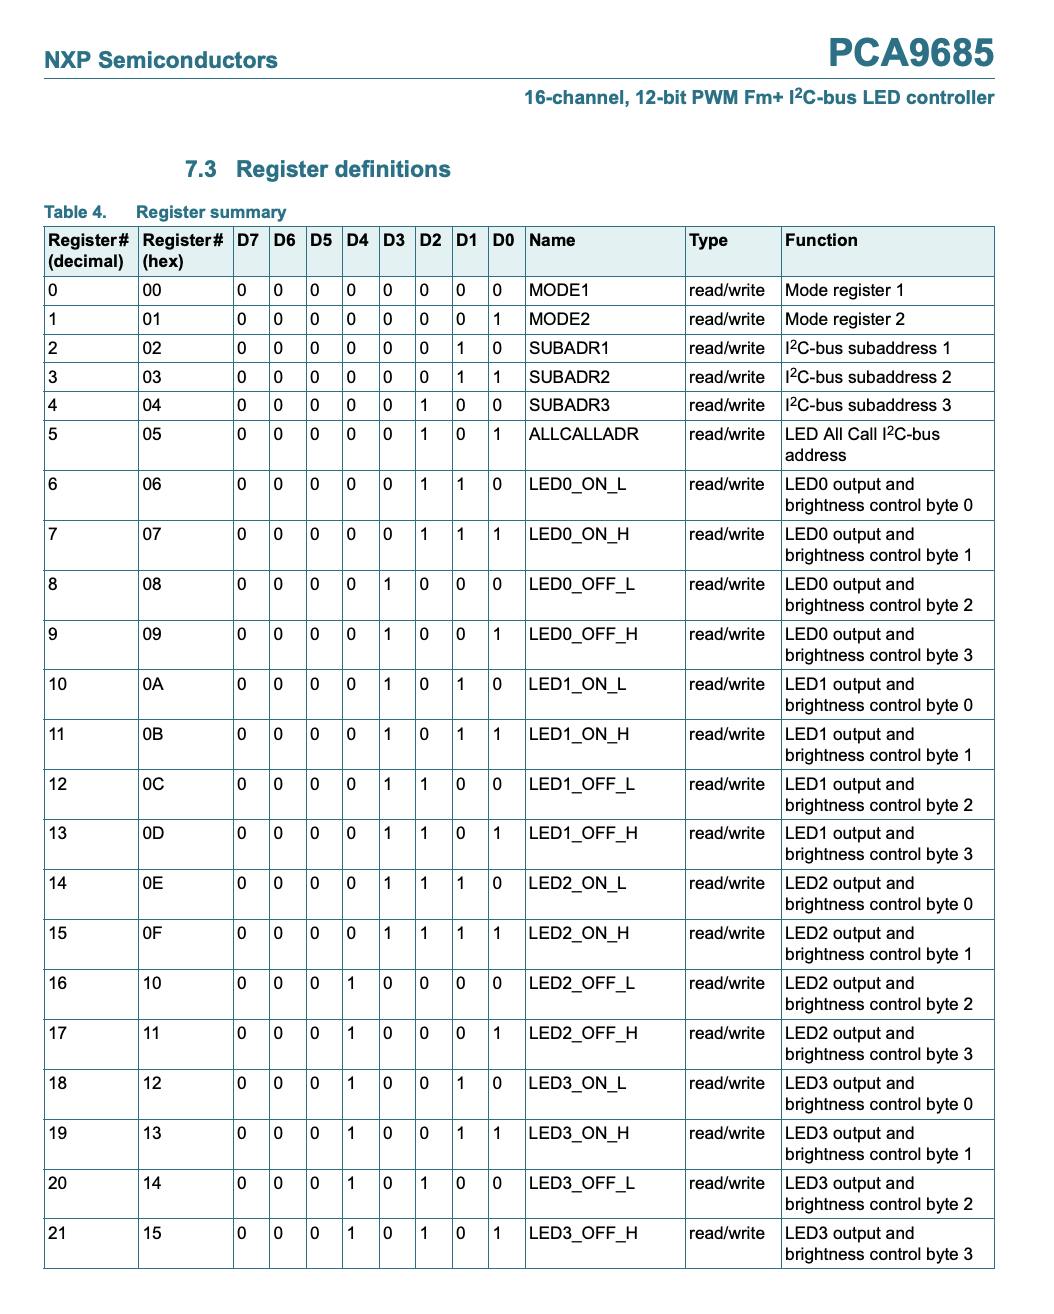
As an Embedded Software or Hardware engineer, you refer to register specs. They are part of the peripheral IC's datasheets. Typically they consist of
- Name of the Register
- Address
- Fields with their range in bits
- Possible values the said fields can take
- Whether the fields are read-only, read-write, or write-only

e.g. Register spec for NXP PCA9685 a 16-channel 12-bit I2C LED Controller
For the sake of specificity, we will limit our discussion to I2C peripherals. I2C peripherals can be viewed as registers that are memory-mapped IO allowing us to control aspects of the chip as well as read status, set up interrupts, and read sensor data.
I2C access is of format:
Write
<START><I2C_PERIPH_ADDR with WR_CMD><REGISTER_OFFSET><WR_DATA0><WR_DATA1>...<STOP>
Read
<START><I2C_PERIPH_ADDR with WR_CMD><REGISTER_OFFSET><REPEATED_START><I2C_PERIPH_ADDR with RD_CMD><RD_DATA0><DATA1>...<STOP>
Good Practices for Register Accessor APIs in C++
As a developer, you distill these specs into driver code, into APIs that can write to read from these registers over the physical bus. You can go minimalistic and write barebones APIs that read or write bytes from and to any given peripheral, and any register address on that peripheral. The API typically abstracts away low-level microcontroller library code for I2C access. You can implement this with or without interrupts, but that is a topic for another day.
// generic I2C access APIs
error_t i2c_write(bus_handle_t* bus, uint8_t periph_addr , uint8_t reg_addr, const uint8_t data);
error_t i2c_read(bus_handle_t* bus, uint8_t periph_addr , uint8_t reg_addr, uint8_t &data);
The bus handle in the aforementioned APIs abstracts the physical bus hardware on the microcontroller or SOC. Notice how the read API gets data as a reference which the callee can infer. This can also be achieved using a pointer or having i2c_read return the data. The above example is having an error type as a return for APIs with the output being a reference argument, but you can implement it in a different fashion e.g. read can return the data, and write can be a void return.
Bare bones APIs are alright, however, it is always a good practice to specific APIs for each field for every register of a peripheral.
error_t peripheral_t::read_calibration_mode(uint8_t &mode) const {
   uint8_t data;
   error_t err = i2c_read(m_bus_handle, m_periph_addr, m_calibration_register_addr, data)
   if (err != NONE) {
      // exception handling
   }
   mode = (data &= MODE_MASK) >> MODE_SHIFT;
}
Above is an example of a field-specific API. The m_* are typically class privates in peripheral_t class. The MASK and SHIFT ensure that the value is populated in the "mode" parameter, specifically of the field.
This accomplishes a few things. First, when a change needs to happen to how a field is being programmed, you can make a laser precision change in one or two lines of the field-specific API.
error_t peripheral_t::write_calibration_mode(uint8_t mode) {
   uint8_t data;
   error_t err = i2c_read(m_bus_handle, m_periph_addr, m_calibration_register_addr, data)
   if (err != NONE) {
      // exception handling
   }
   data &= (mode << MODE_SHIFT)
   error_t err = i2c_write(m_bus_handle, m_periph_addr, m_calibration_register_addr, data)
   if (err != NONE) {
      // exception handling
   }
}
Secondly, for the write APIs, we are able to perform read-modify-write, which is critical in ensuring that we are only changing the field that we are interested in. Lastly, from a debugging standpoint, it is easier to set a breakpoint in this API and analyze it.
Struct Bitfields
Thus far, we talked about the modularization of register programming. Next, we would like to think about memory implications. C Struct Bitfields introduced a way to encapsulate fields with varying bit widths in a packed struct. e.g. If you are using 8-bit width registers, this provides an effective means to pack named fields.
#include <iostream>

struct S
{
    // will usually occupy 2 bytes:
    // 3 bits: value of b1
    // 2 bits: unused
    // 6 bits: value of b2
    // 2 bits: value of b3
    // 3 bits: unused
    unsigned char b1 : 3, : 2, b2 : 6, b3 : 2;
};

int main()
{
    std::cout << sizeof(S) << '\n'; // usually prints 2
}
C++ extends the struct bitfield concept further. Specifically, In the C programming language, the width of a bit-field cannot exceed the width of the underlying type, and whether int bit-fields that are not explicitly signed or unsigned are signed or unsigned is implementation-defined. For example, int b:3; may have the range of values 0..7 or -4..3 in C, but only the latter choice is allowed in C++. reference
Struct Bitfields are a good choice for representing peripheral registers, despite some quirks i.e. platform specific implementation - the bytes may be straddled or not, the bits may be left-to-right or vice.
Auto Generating Register Driver
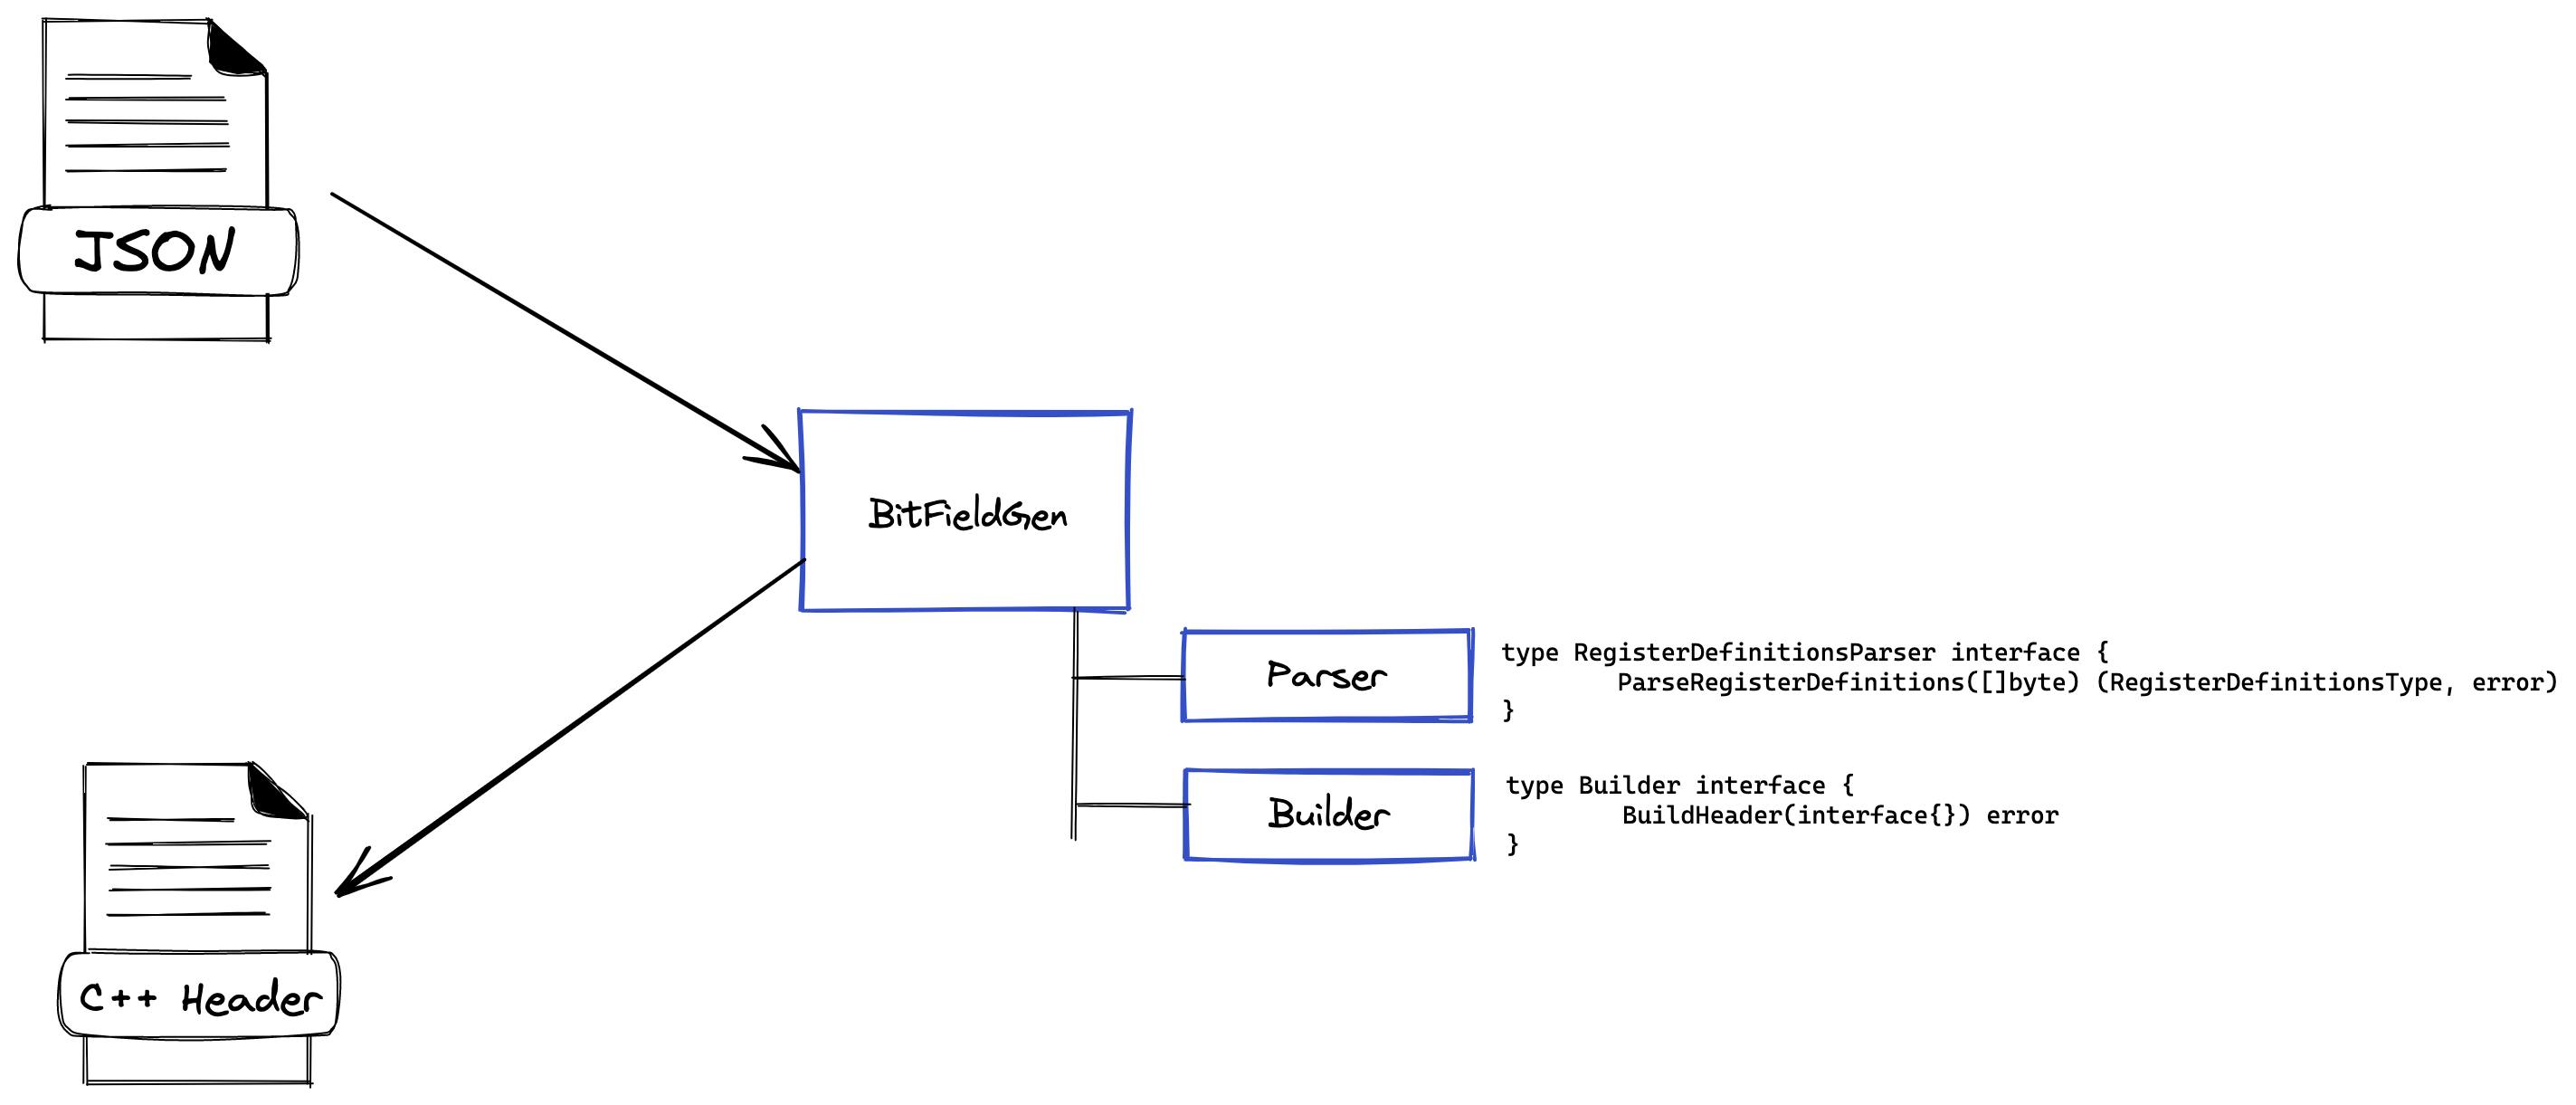
It can get tedious and error-prone to program registers manually, especially if the peripheral boasts of dozens of registers, each containing multiple fields with varying attributes. Auto-gen to the rescue! We can describe the register spec in a machine-readable format and generate code.
I use a JSON way of defining registers. See the example below for an I2C mux peripheral. It consists of a single register "control_reg" with fields "interrupts", "enable" and "channel_selection".
{
  "peripheral_name": "PI4MSD5V9542A",
  "description": "2 Channel I2C bus Multiplexer",
  "spec_url": "https://www.diodes.com/assets/Datasheets/PI4MSD5V9542A.pdf",
  "address": 64,
  "config": {
    "width": 8
  },
  "registers": [
    {
      "name": "control_reg",
      "address": 0,
      "fields": [
        {
          "name": "interrupts",
          "attribute": "r",
          "msb": 5,
          "lsb": 4,
          "values": {
            "int_0": 0,
            "int_1": 1
          }
        },
        {
          "name": "enable",
          "attribute": "rw",
          "msb": 2,
          "lsb": 2
        },
        {
          "name": "channel_selection",
          "attribute": "rw",
          "msb": 1,
          "lsb": 0,
          "values": {
            "channel_0": 0,
            "channel_1": 1
          }
        }
      ]
    }
  ]
}
Next, we need a script that consumes this JSON and spits out code! I developed bitfieldgen , an utility written in Go, which parses the aforementioned JSON format and builds a C++ header.

The generated code looks as follows, let's save it in a file "multiplexer_api.h"
#pragma once
/* auto-generated file using bitfieldgen

 Peripheral Name PI4MSD5V9542A
 Description 2 Channel I2C bus Multiplexer
 Specifications https://www.diodes.com/assets/Datasheets/PI4MSD5V9542A.pdf
*/

constexpr static unsigned int c_peripheral_addr = 64;
void io_write(const unsigned int reg_addr, const unsigned int data) {

};

void io_read(const unsigned int reg_addr, unsigned int& data) {

};

class register_control_reg_t {
private:
    constexpr static unsigned int c_register_addr = 0;
    union register_defs_t {
        struct fields_t {
            unsigned int interrupts : 2; // READ_ONLY
            unsigned int reserved_0 : 1; // UNSUPPORTED
            unsigned int enable : 1; // READ_WRITE
            unsigned int channel_selection : 2; // READ_WRITE
        } m_fields;
        unsigned int m_data;

        register_defs_t() {
            io_read(c_register_addr, m_data);
        };
        register_defs_t& operator=(const register_defs_t& other) {
            m_data = other.m_data;
            return *this;
        };
        void operator=(const unsigned int val) {
            m_data = val;
            io_write(c_register_addr, m_data);
        };
    };

public:
    enum class interrupts_t {
        INT_0 = 0,
        INT_1 = 1,
    };

    enum class channel_selection_t {
        CHANNEL_0 = 0,
        CHANNEL_1 = 1,
    };

    register_control_reg_t() = default;
    ~register_control_reg_t() = default;
    interrupts_t read_interrupts() const {
        auto defs = register_defs_t{};
        return static_cast<interrupts_t>(defs.m_fields.interrupts);
    };

    unsigned int read_enable() const {
        auto defs = register_defs_t{};
        return defs.m_fields.enable;
    };

    void write_enable(unsigned int val) {
        auto defs = register_defs_t{};
        defs.m_fields.enable = static_cast<unsigned int>(val);
        defs = defs.m_data;
    };

    channel_selection_t read_channel_selection() const {
        auto defs = register_defs_t{};
        return static_cast<channel_selection_t>(defs.m_fields.channel_selection);
    };

    void write_channel_selection(channel_selection_t val) {
        auto defs = register_defs_t{};
        defs.m_fields.channel_selection = static_cast<unsigned int>(val);
        defs = defs.m_data;
    };

};
Notice the io_read and io_write APIs. This is where you can call your I2C or another bus low-level APIs. You may need a bus handle to be stored as well for utilizing the APIs.
Here's a small driver code for testing it out
#include <iostream>
#include "multiplexer_api.h"

using namespace std;

int main() {
    register_control_reg_t contol_reg{};
    auto selection = contol_reg.read_channel_selection();
    cout << "selection before: " << static_cast<unsigned int>(selection) << endl;

    contol_reg.write_channel_selection(register_control_reg_t::channel_selection_t::CHANNEL_1);
    selection = contol_reg.read_channel_selection();
    cout << "selection after: " << static_cast<unsigned int>(selection) << endl;

    auto enable = contol_reg.read_enable();
    cout << "enable before: " << static_cast<unsigned int>(enable) << endl;

    contol_reg.write_enable(1);
    enable = contol_reg.read_enable();
    cout << "enable after: " << static_cast<unsigned int>(enable) << endl;

    return 0;
}
Output
selection before: 0
selection after: 1
enable before: 0
enable after: 1
Next Steps
I would publish the go module so that it can be imported by anyone using a "go get" command. It is currently behind the register-bitfields repo and is giving problems importing.
I will continue polishing this generation code. The README provides guidelines on usage. It also touches upon some C++ coding choices such as operator overloading. We are implementing read-modify-write using the overloaded constructor for the read and assignment operator for write. This is subjective and you can get rid of overloading if you prefer.
Looking forward to comments and suggestions, watch this space for more interesting utilities for IoT development!